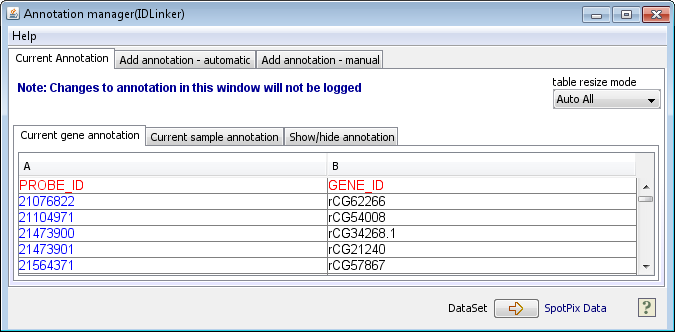
Annotation manager (ID Linker)
The annotation manager component can be used to modify, add or
delete annotation for genes and samples. You may double-click any cell to change
its value. Right-click the table to add annotation columns or delete existing
columns (click a cell in a column you want to delet, then right-click to delete the column).
There are tree main tabs:
- The Current annotation tab
- The Add annotation - automatic
- The Add annotation - manual
The use of the Current annotation and Add annotation - automatic should be quite intuitive, so only a guide for Add annotation - manual is provided here.
Add annotation - manual
The manual annotation manager can be used to add both gene annotation and sample annotation. You can mark which type of annotation you want to add in the middle of the window:
- Gene annotation (rows)
- Sample annotation (columns)
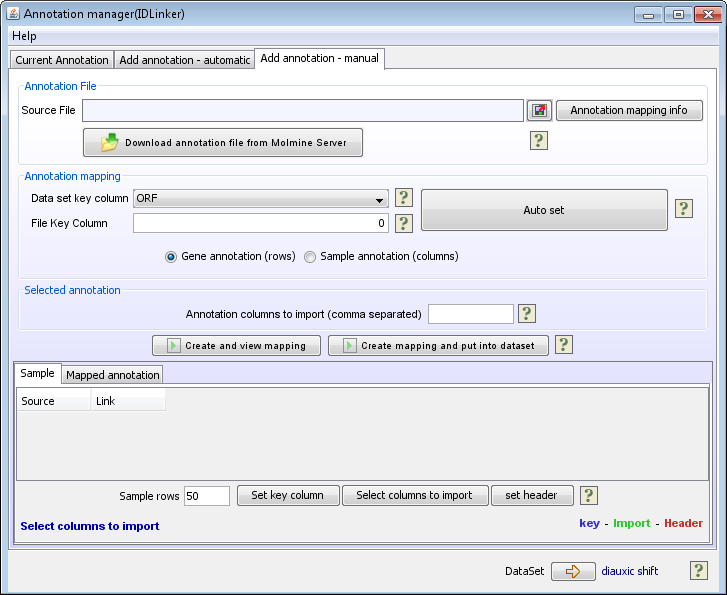
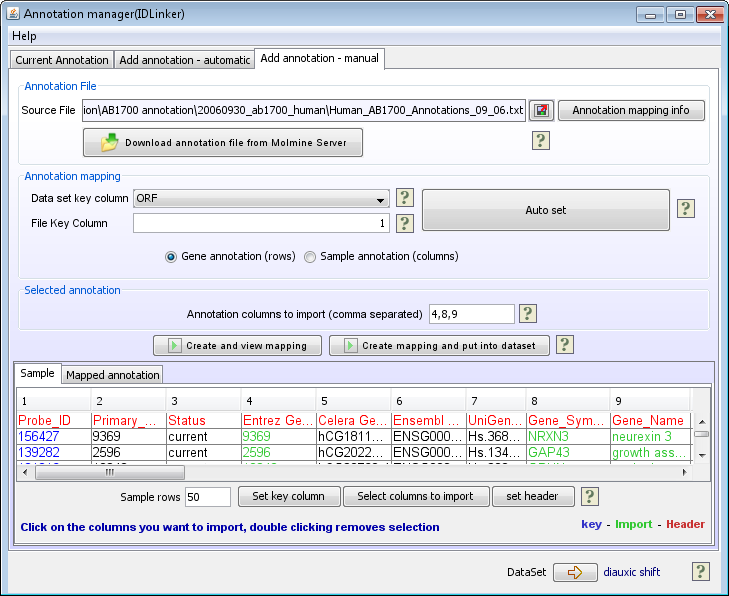
Annotation File
The annotation file is a tab-delimited text file containing columns with different types of annotation. Annotation files can often be obtained from the array producers, but can also be created from annotation data bases. To be able to link the annotation to the dataset, one of the columns in the annotation file must contain the same IDs that are already in your J-Express data set. Often the overlapping ID will be probe IDs.
- Click on the
 button and locate the annotation file.
The annotation file will now be read and presented in the spread sheet at the bottom of the page.
Illumina annotation files can be downloaded from Illuminas file distribution pages: http://switchtoi.com/annotationfiles.ilmn. Download the last updated .txt file for your array version (make sure its the correct arraytype and version number), the file having the highest R-number is the file that contains the lastest updates.
Annotation Mapping
- If you haven't done so already, then select whether this is Gene annotation or Sample annotation
- Press the Auto set button.
- Once the auto set is finished, it is important to double check that it has selected the correct column from your J-Express dataset (Data set key column) and that it has marked the correct corresponding column in the spread sheet. The selected column in the spread sheet will be marked blue. If Auto set has selected the wrong IDs to map, you can correct this manually as follows:
- From the Data set key column combo-box select the ID from your dataset that should be used for the mapping
- At the bottom of the page, click on the Set key column button, before clicking on the column in the spread sheet that should be used for the mapping. This column should now turn blue, and the column number will be updated in the File Key Column text field, in the middle of the page.
Select Columns To Import
- If Auto set worked, you can just start clicking on the columns to import. The columns you click on should turn green and the column numbers will be added to the Annotation columns to import (comma separated) text field.
- If Auto set did not work and you had to set the key column manually, then you have to click on the Select columns to import button at the bottom of the page, before clicking on the columns you want to import.
- If the annotation file contains a header row, then click on the Set header button before clicking on the header row. The header row should now turn red. By doing this the header names from the annotation file will be added to the columns when added to the J-Express dataset.
- There are two ways of putting the mapped annotation into your
dataset:
- Create and view mapping opens the mapped annotation
table and previews the mapped annotation. You can then click the put
annotation in dataset button to add the new annotation to the selected
dataset.
- Create mapping and put into dataset directly
maps the new annotation and adds it to the dataset.