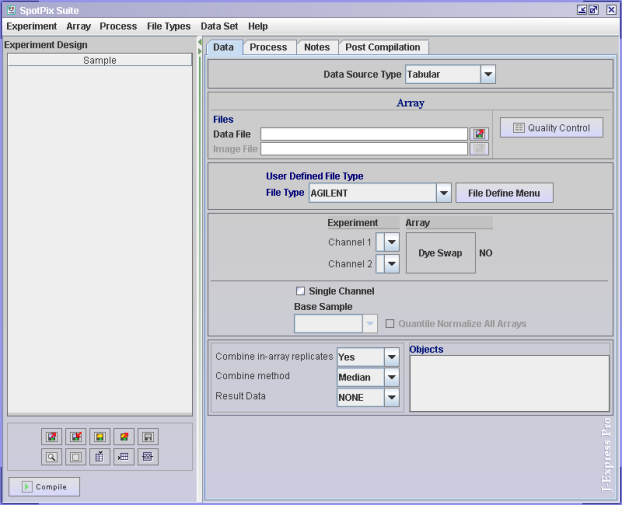
Tabular

If you have a data file type that is not supported here, you can
define your own file type for importing data. All defined tabular file types
will be available from the File Type selection combo box. Select a
file type from the selection combo box, or click the File
Define Menu button to define a new file type, modify
an existing file type or import a user defined file type.
The File Define Menu holds a list of all User
Defined File Types. From here you can define new file types,
edit a selected file type from the list or delete a
selected file type from the list. It is also possible to Import file
types defined by others or Export the defined file types so
that it can be sent to other people. When you have finished editing your File
Define Menu, click OK to go back to the SpotPix Suite.
Click the  Create
New or
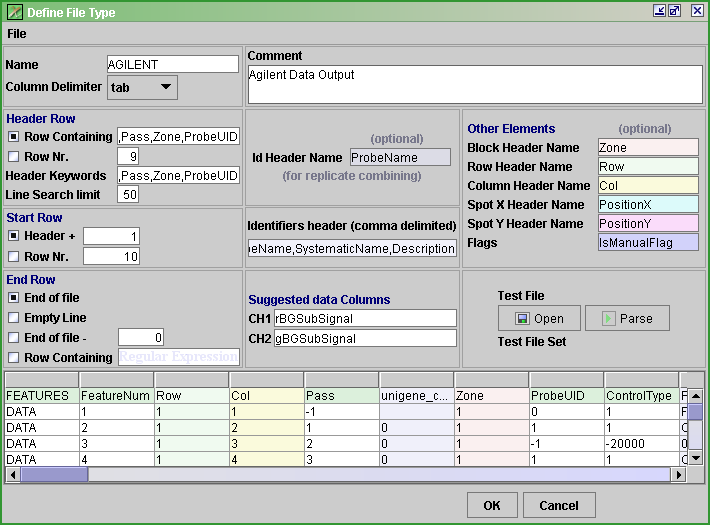
  Edit Selected button to open the Define File Type
window.

Fill in the File Type Properties to define the
file type.
- Name : the name will be added as an identifier of this
file type to the File Type combo box in the Data Tab in SpotPix Suite.
- Column Delimiter : The columns can be delimited by either
tabular, comma or space.
- Header Row :
- Row Containing: Type the headers for this filetype,
separated by commas.
- Row Nr.: If you know the header row to always start
on the same row number, you can select this option and enter therow number.
- Header Keywords: If you drag and drop files into the
SpotPix Suite Experiment Design area when setting up the experiment, the
header keywords typed in this text field will be used to identify the
file type.
- Line Search limit: Normally the header row is found
somewhere near the top of a file. Some files can be quite large, and searching
through the entire files for the header keywords can be time consuming.
It is therefore a good idea to set a limit for how many lines of a file
should be searched. If no hit on the header keywords are found within
the first e.g. 50 lines, the file will be reported as unknown file format.
- Start Row : The index number of the first data row
- Header +: use this if you do not know the exact row
number, but you know that the first row starts a certain number of rows
after the header row.
- Row Nr: If you know the first data row to always start
on the same row number, you can select this option and enter the row number.
- End Row
- End of file : end row is the last row in the file.
- Empty Line: end row is the last row before an empty
line.
- End of file - : end row is a certain number of rows
before end of file, ie: end of file minus a certain number
of rows.
- Row Containing : end row is a row containing a specific
text or a regular expression.
- Comment : short description of this file type.
- Id Header Name (optional) : the name of the column containing
the spot identifications
- Identifiers headers (comma delimited) : type the header
of the identifier columns in this text field, and separate each header by
a comma.
- Suggested Data Columns: here you can set default columns
to use for a particular filetype. When a file is dropped into the SpotPix
Suite Experiment Design area when setting up the experiment, the default suggested
data columns will automatically be set for channel 1 and channel 2.
- Other Elements (optional)
- Block Header Name : this column holds which array block
a spot belongs to.
- Row Header Name : this column holds which array rows
a spot belongs to.
- Column Header Name : this column holds which array
column a spot belongs to.
- Spot X Header Name : this column holds the x coordinates
of the spots. This will be used by the Quality Control component to identify
where the spots are.
- Spot Y Header Name : this column holds the y coordinates
of the spots. This will be used by the Quality Control component to identify
where the spots are.
- Flags : this contains information on whether the spots
are flagged or not.
You should now test your file format. Click the  Open (Choose a test file) button. See that the Test File Not
Set label changes to Test File Set, and click the
 Parse button. The result will be displayed in the lower part of the
window. If everything looks as you expected, click OK. If it
doesn't look as it should, check that all your parameters are entered correctly.
Remember that all Header Names must be entered exactly as they appear in the
file.
Experiment/Array (Data Tab SpotPix Suite)
Except for a couple of things, the rest of the experiment setup
for user defined data type is very much like GenePix
data type.
If your dataset have only one channel, check the Single
Channel check box, and set which array you want to use as a base
sample for log ratios and normalizations. Set the preferred selection
for Channel 1.
If your dataset have two channels, see that the
Single Channel check box is unchecked. Set the preferred selection for Channel
1 and Channel 2.
Note: No objects can be saved to the Project Dataset data
source type.
Quality Control
The Quality Control of User Defined data type is the same as for
GenePix.
See SpotPix for filtering
and normalization of the data.


![]() Create
New or
Create
New or ![]() Edit Selected button to open the Define File Type
window.
Edit Selected button to open the Define File Type
window. 
![]() Open (Choose a test file) button. See that the Test File Not
Set label changes to Test File Set, and click the
Open (Choose a test file) button. See that the Test File Not
Set label changes to Test File Set, and click the
![]() Parse button. The result will be displayed in the lower part of the
window. If everything looks as you expected, click OK. If it
doesn't look as it should, check that all your parameters are entered correctly.
Remember that all Header Names must be entered exactly as they appear in the
file.
Parse button. The result will be displayed in the lower part of the
window. If everything looks as you expected, click OK. If it
doesn't look as it should, check that all your parameters are entered correctly.
Remember that all Header Names must be entered exactly as they appear in the
file.